Ensuring a certain level of performance, regardless of uncertainty factors, is a major challenge in radar sensor development and integration into vehicles
ADAS needs access to high-quality and reliable data from the various radar sensors to correctly detect its surroundings. The varying material properties of radomes and bumpers can massively influence signal quality. Rohde & Schwarz offers a new approach: a test system that can be integrated into all phases from the initial design process through to the production end-of-line testing of each radome and bumper to ensure reliable and robust performance of the overall ADAS.
Current situation
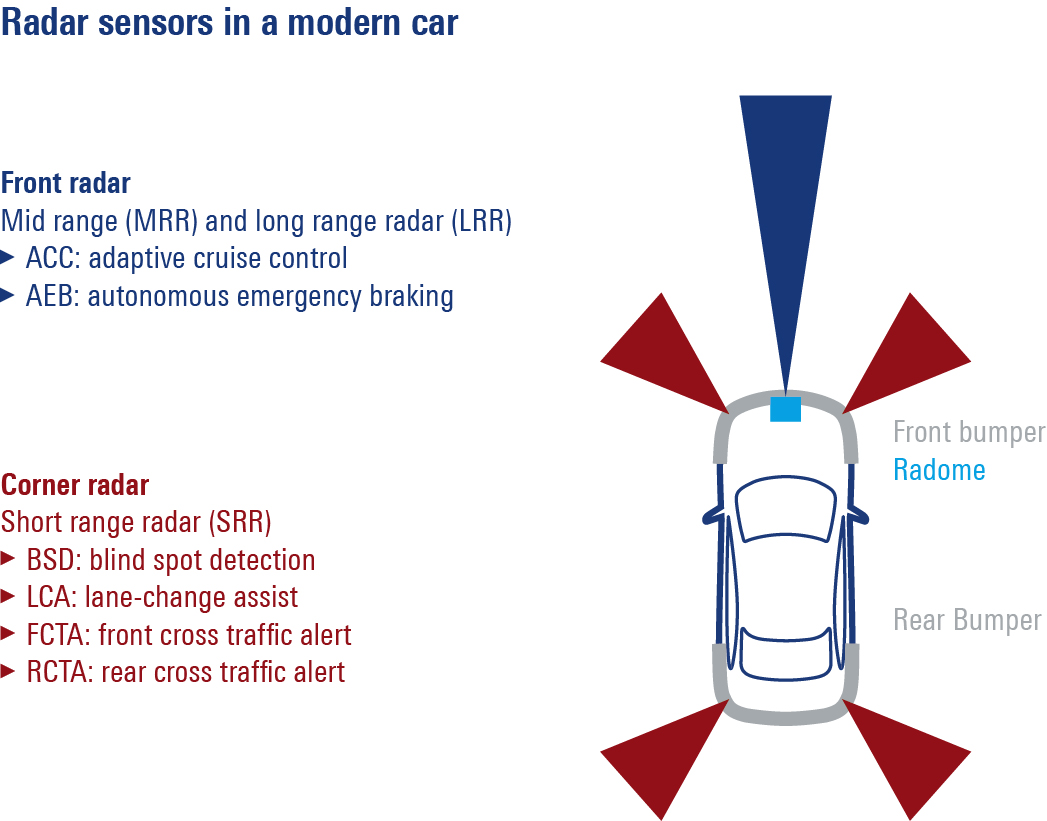
A vehicle’s radar system emits frequency modulated continuous wave (FMCW) chirps and then measures the propagation delay and Doppler frequency shift of the reflected signal. This data is used to calculate the distances of other objects (such as other vehicles or passersby) and the corresponding radial velocities. Current radar sensors measure the azimuth (angle of the horizontal plane) between the direction of travel of a vehicle and a detected object, as well as the elevation (angle in the vertical plane) between a vehicle and other objects.
It is of utmost importance that these automotive radar sensors are accurate and reliable, as a vehicle’s control systems use the data they provide to analyze the environment and decide whether or not to intervene in driving. For example, a radar sensor’s misjudgment of a 1° angle of two vehicles that are 100m apart can result in a deviation of 1.5m width which could have disastrous consequences.
For aesthetic reasons, radar sensors are usually hidden behind a design emblem and the bumpers of a vehicle. From a functional point of view, there are disadvantages, as the radar signals have to pass through materials that have a damping effect. Radomes and bumpers form part of the high-frequency system of the sensor and can have a massive negative impact on its detection performance and accuracy.
On the one hand, radomes and bumpers can attenuate the radar signal by several dB, which would result in the overall ADAS reaching a shorter total distance or squinting at the side radar. On the other hand, radomes and bumpers can be the cause of a mismatch between the base material and the radar signal. The material properties of molded plastic parts and semi-metallic surface coatings are often heterogeneous, which can lead to unpredictable signal distortions, such as phase distortions, in the received signal.
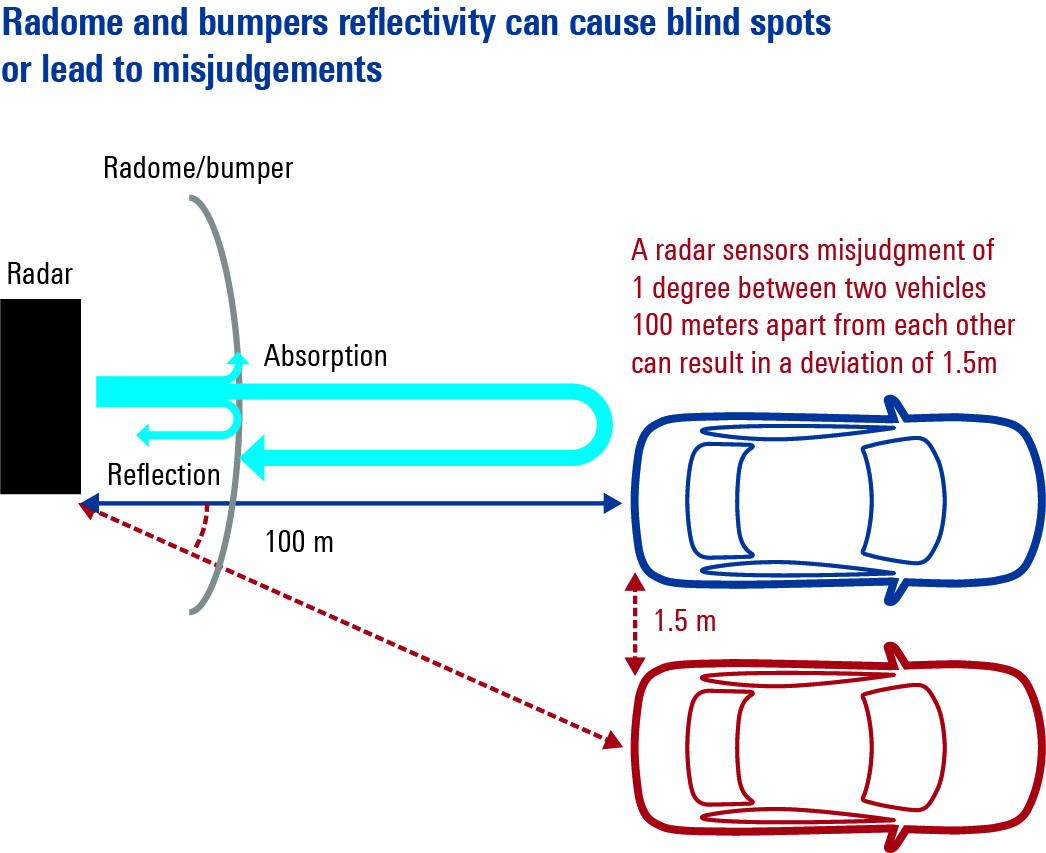
Figure 2: Radome and bumper reflectivity can cause blind spots or lead to misjudgments. A radar sensor misjudgment of 1° between two vehicles 100m apart can result in a deviation of 1.5m
Millions of automotive radars are produced every year, and car manufacturers are starting to deploy this as standard equipment in all high-class vehicles, plus middle- and lower-class cars soon. The emerging demand here is that every bumper and radome will have to be tested for their impact on the overall system in production.
Manufacturers’ challenge today
The challenge during radar sensor development and integration is to ensure a certain level of performance despite various inherent systemic uncertainty factors. Any reduction in systemic uncertainty therefore makes it easier to achieve the required performance. For example, radar sensor manufacturers can calibrate their products. However, RF system designers are aware that the sensor manufacturers cannot know under which type of radome or bumper the sensors will be installed, how the radome and bumper are painted and what material irregularities will occur.
It is up to the respective radome and bumper manufacturer to test and validate the properties of their corresponding products along all phases starting at the initial design phase all the way to the production line. Radome and bumper manufacturers therefore need a way to conduct detailed, fast, robust and reliable tests along all phases – particularly in production in end-of-line testing.
A new approach
To address the increasing importance of radar system performance in vehicles, Rohde & Schwarz focuses on a new approach. With hundreds of receiving and transmitting antennas, materials of radomes and bumpers can quickly be characterized. The microwave imaging technology, with its electronic focus, enables more flexible positioning of the DUT. Two clusters and customizable frequency bands measures one-way transmission loss, reflection on both sides, and the transmission phase in as little as 4 seconds. The results are directly comparable with vector network analyzer free space measurements.
Flexible measurement setup for accurate positioning
Precise and repeatable reflection and transmission measurements depend on accurate positioning. Most T&M setups have very limited space between their DUTs and the transmit and receive antennas. Especially with space-occupying front and rear bumpers, it can be ambiguous to find sufficient space. For these cases it is important to get enough insertion space between the clusters, making it possible to easily place radomes and bumpers manually or by robot. Furthermore, depending on the requirements and structure of the production line, an operation upright in a C or lying down in a U position provides enough possibilities. This allows flexible positioning, simplifies handling and minimizes integration effort.
Instrument setup
Measurements conducted as standard for one-way transmission loss show reflection on both sides, ranging in one sweep in the frequency between the bands 76-77GHz and 76-81GHz.
Before bringing radomes and bumpers to end-of-line testing, it is important to be able to make a statement about the homogeneity of the designs at an early stage. An additional phase mask option enables measurement in the transmission phase. This enables analysis of the homogeneity of the radome and bumper without mechanical movement.
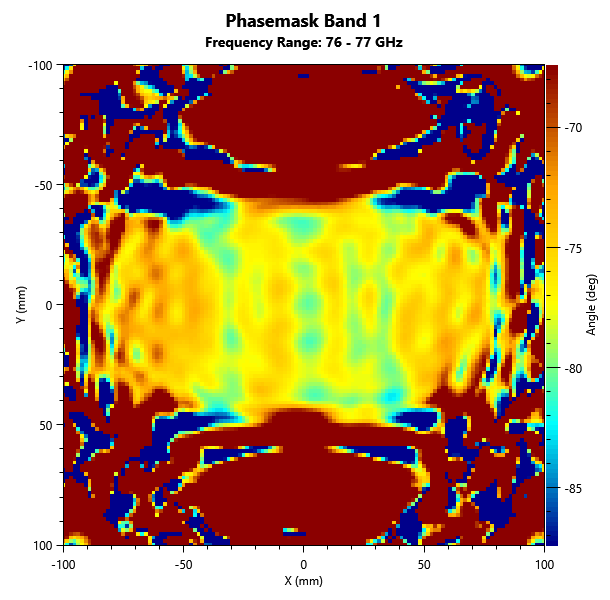
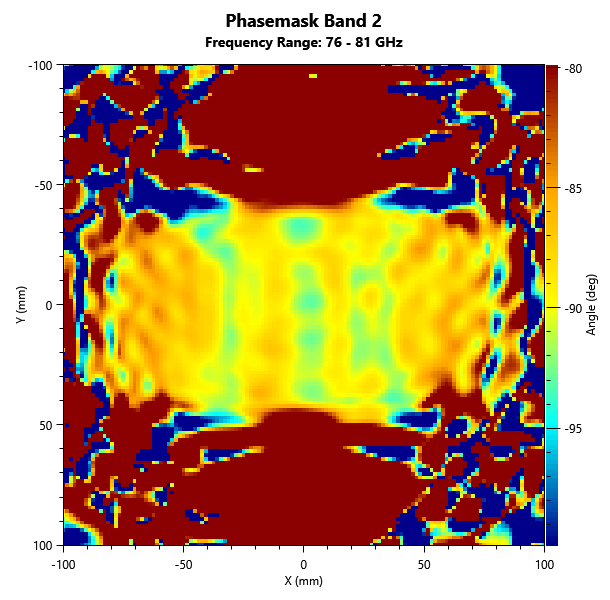
In addition, the geometry and edges of radomes can also have high influences. With microwave technology, it is possible to display a high-resolution reflection image to quickly detect disturbances. It also makes the mounting structure clearly visible and facilitates fast and correct positioning of DUTs.
When bringing the radomes and bumpers to production testing, a streamlined user interface makes it possible to have all the necessary information at a glance. A reduced menu navigation permits operation of the unit without RF expertise. It shows the numerical values of reflection as well as transmission measurements and gives information about the positioning of the DUT. All this makes it easy to understand values, read them out and therefore it’s perfectly suited for end-of-line testing.
Some OEMs have higher requirements specifications in their end-of-line testing. For that reason, the frequency has to be extended for both bands in the range from 72-82GHz. It shows the frequency response of reflection and transmission loss. This enables detection of the correct frequency adaption of the material and, if needed, adaptation of the thickness of the material. In production, the reflection minimum makes it possible to quickly detect mismatches and fluctuations of the DUTs.
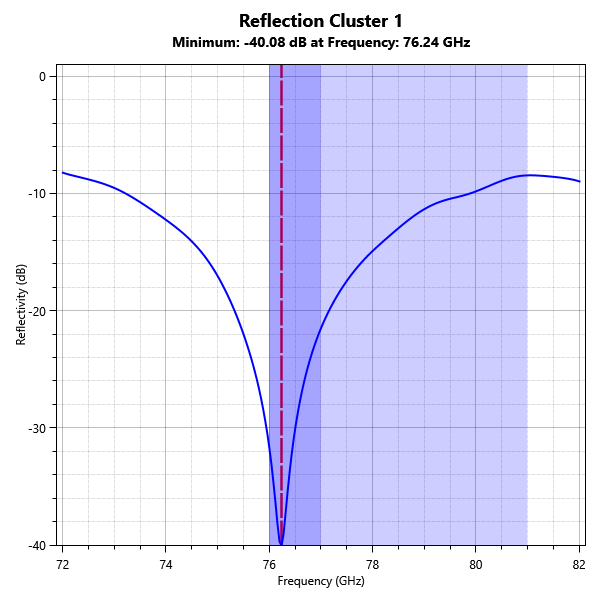
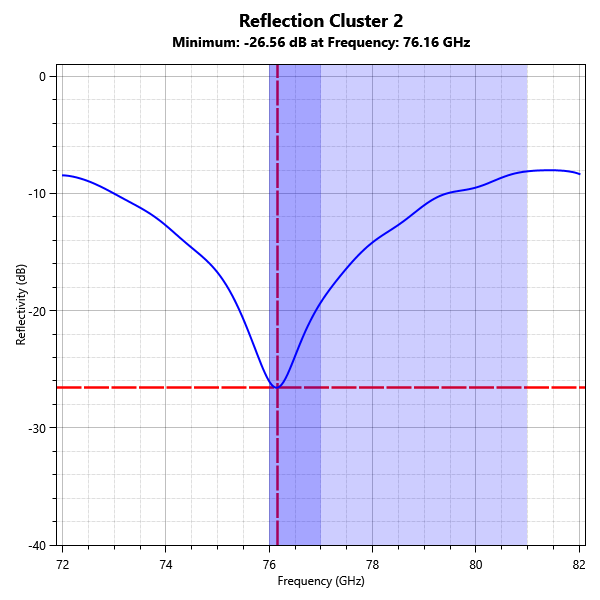
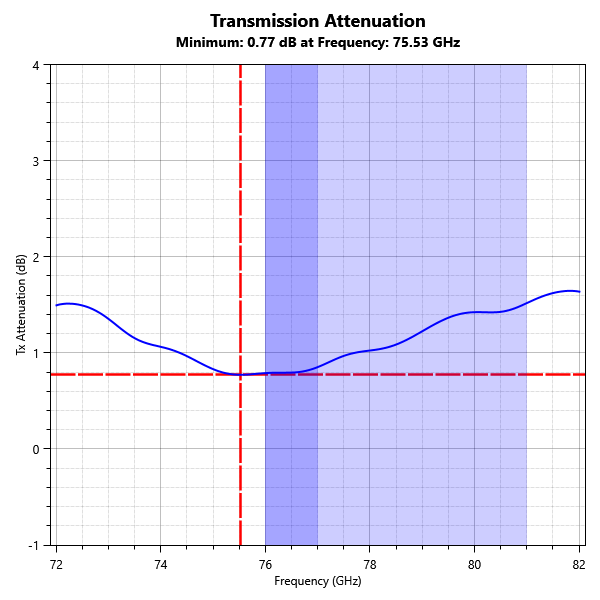
With respect to the measured parameters, precision, reliability and robustness are the core competencies of a measurement device aimed at production testing. Reflections in particular have a major influence on the radome and bumper quality; being precise is essential. Here the new radome tester actually measures the reflection and doesn’t calculate it based on the transmission phase and loss information (which causes inaccuracies). Time-gated measurements ensure an optimized product and constant quality of the manufacturing process.
Performing accredited open-space measurement/characterization ensures the highest accuracy and repeatability of measurement results. With additional verification plates, the measurements for transmission loss and reflection can be verified to national and international standards.


